Monster Scenery:™ Cyberpunk Red: Combat Zone Shipping Containers Paint Over
by Audrey Jaeger on Sep 08, 2023

At Monster Fight Club, we're always excited to see the fantastic creations and projects our Monsters undertake using our products. Today, we're thrilled to share one such project that's sure to inspire you. Jonathan Hord has truly impressed us with their attention to detail and passion for transforming our shipping containers. In this post, you'll find incredible photos and a detailed account of their process, including rebranding, aging, and adding graffiti to the containers
We hope you enjoy!
-Team Monster
Monster Scenery:™ Cyberpunk Red: Combat Zone Shipping Containers Paint Over
By: Jonathan Hord
Hey there.
I’d like to share my Monster Scenery ™ Shipping Container project with you—a total over hall on the Cyberpunk Red: Combat Zone shipping containers.
I like to start out priming in white on almost all miniature products, but with this specific project being more extensive, I played with some Matte $4 hardware store paint to base with. I learned very quickly that cheap paint takes a lot longer to dry than the ones I painted with Miniature Primer (Army Painter). I learned Matte Hot Pink takes the absolute longest time to dry!
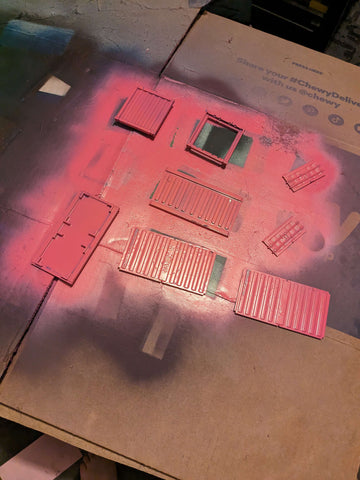
After priming them, I moved to dry brushing. Almost all model paint I use is Citadel, as I got my start painting back with Warhammer in 2012. I dry-brushed first with a similar but lighter version of the base coat. I was heavy-handed in that dry brushing, then moved to a near-white like Ulthuan Grey and applied that in lesser quantity. My idea was to create a reverse vignette with the dry brushing so the center was more saturated and vibrant and the edges looked more sun-bleached. It isn't truly accurate to how sun bleaching works, but the darker center allowed the white logos to POP more when applied.

For the metal piping, I based in Leadbelcher. The goal here was to have a metallic for the wash to cover. These will be redone in their entirety before it's all done.

I knew I wanted to figure out logos before weathering. I went back and forth on using Cyberpunk, actual, or parody companies. My best friend works in Logistics, so I decided to go with actual shipping companies because she'd like to display one on her desk. This also allowed me to pull up real pictures of shipping containers as a reference. All the logos were done freehand. I should have used a stencil. I have a fantastic Badger Airbrush that would work perfectly for this project. However, in the end, I trusted the brush more and free-handed the logos. I work in Advertising (video/animation), so I was obsessing over the kerning between each letter. You can tell it was getting late when I was on the Cosco container as the logo quickly became jumbled by the time "Shipping" was added lol. Have no fear; any error can be covered with Graffiti!


Once I finished the primary shipping container, it was time to start muddying up all that nice work. I went in with Agrax Earthshade wash, put pooling in the top and bottom crevices, and then pulled the wash down from the top with my fingers to smear the wash, giving it the grimy look. The goal here is to dirty up the model without it swimming in the wash.


Up until this point, I was reasonably confident in my abilities. Though most of my background is in painting Fantasy miniatures, I have painted in the Grimdark future before, Making dirty, grimy models I'm familiar with. I have zero understanding of urban art. I have spent the last week looking up tags and graffiti and watching many miniature painting tutorials from the Model Railroad subsect of the community. Shoutout to all the railfans who have pioneered the art of adequately vandalizing a model you just spent 10 hours painting!
I found a graffiti tag generator online that lets you type in a work/company and make different graffiti styles. More importantly, it let me turn layers on and off. This allowed me to break apart the graffiti into blocks of flat paint and then come back in with a fine-tip sharpie and outline the letters. Honestly, until the outline, I was worried it wasn't working, but the black outline and shadow were added as the last step, bringing the entire thing to life. Now, I just need to replicate that process a bunch more times.


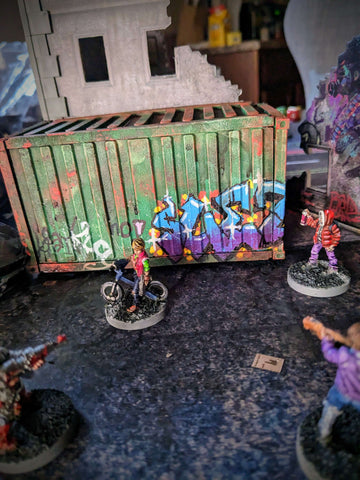

Photo Credit: Jonathan Hord


